Dr. Nirupa Bareja
A PhD in Biological science she is Director, India operations of VICUS Therapeutics, USA. She is chief advisor of Mazumdar Shaw Medical foundation. Investor in top notch companies like Sigtuple & Silvan innovation technologies. An advisor for innovative start-up companies like 1 Crowd & Plantbyte
As is the case with most things we do at home - be it cooking, baking, painting, pottery, sewing etc - there is a special charm when we dirty our fingers making commercially available products - both edible & otherwise in the comfort of our own spaces. One such satisfying and enjoyable activity is brewing your own beer / brew.
Believe me once you’ve decided to make your own beer, you’re about to engage in a wondrous and rewarding task almost as old as humanity itself. But there’s no reason to be intimidated. Although people have been brewing beer for millennia, the basic process has remained much the same through the ages.
In this article I will discuss what personal brewing equipment one will need to get started as well as walk you through the basic steps of how to brew a standard beer. It’s time, as homebrewing godfather Charlie Papazian says, to “Relax, don’t worry, have a homebrew.”
The Basic Process
First off, personal brewing can be divided into two types:
- all grain and extract
Beer is made using the sugars from malted (partially germinated) grains. In all grain brewing, the brewer via a series of steps extracts these sugars from milled grains by him or herself. In extract brewing, the homebrewer uses ready-made malt extract, skipping the sugar extraction process entirely as it has already been done. Extract brewing is a good starting point for most new brewers because the process requires minimal beer equipment and procedures while still producing quality beer, and it’s the type of brewing we’ll focus on here.
Equipment required
 You may know someone who has converted his or her entire basement or garage into what practically looks like a professional brewery, full of shiny tanks and kegs, welded pipework, washing stations, and fridges with tap handles always pouring out beautiful foamy beer. But rest assured there is no need to invest a fortune to get started making your own beer. The easiest way to go is to just buy a basic personal brewing kit. You can always add fancier brewing gadgets after you’ve brewed for a while and decided it’s something you love (which you will, of course).
The basic kit consists of:
- 6.5-gallon “Ale Pail” primary fermenter with lid
- 6.5-gallon “Ale Pail” bottling bucket with spigot
- Easy Clean no-rinse cleanser
- Airlock
- Siphon and bottlin-set-up
- Hydrometer
- Bottle cleaning brush
- Twin lever bottle capper
- Liquid crystal thermometer
- Bucket clip
- Home beer making booklet
- Equipment instructions
- You will also need a cooking thermometer and a 3-5 gallon stock pot, which is available as an add-on if you don’t already have one Ingredients
Now that you have the equipment taken care of, let’s go over the main ingredients of beer. There are only four:
1. Hops
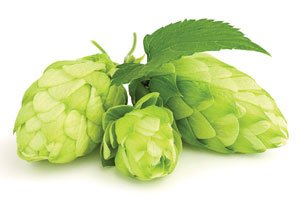 Hops are the flowers (cones, really) of the plant Humulus lupulus. Hop cones from female plants are used in brewing and contain the alpha acids that determine that particular hop’s bitterness. The higher the alpha acid percentage, the more bitterness that hop will contribute to your boil. Typical boils last 60 or more minutes because the hops’ alpha resins are not readily soluble in water and must be boiled for at least an hour to release their bitterness.
Important note: The acid percentage of hops varies from year to year, hop variety to hop variety, and region to region, so it’s important to keep good records of your brewing so that you can duplicate your successful brews. Refer to the package your hops come in for the most accurate alpha acid percentage.
In addition to being used in the boil to add bitterness to your finished beer, hops are also added toward the end of the boil to impart aroma and fragrance. This is important because much of what we perceive as taste comes through our sense of smell. Hops used in the boil are called bittering (or boiling) hops, while hops added at the end are known as aromatic (or finishing) hops.
2. Grains
Even if you are brewing with malt extract, using a small amount of what are called “specialty grains” can help give your beer added flavour, aroma, colour, and body. Buying your grains from a reputable homebrew shop like Adventures in Homebrewing will help ensure that you’re getting grains that are fresh, organic and have been stored properly.
To be used in making beer, grains must first be milled (or crushed). You can do this at home if you have a grain mill or other method capable of crushing the grains finely, or you can do it (or have it done)
at a commercial mill - care must be taken as regards the cleanliness of the mill equipment etc- Crushed grains should be used as soon as possible, while uncrushed grains will store well for up to four months.
3. Malt Extracts
Using malt extracts is a convenient way of making your own beer and can make the process more enjoyable for new brewers. Whether you have just a few or more than a hundred batches under your belt, extracts can produce exceptional beers. The quality of extracts has improved greatly over the years and can be depended on to provide consistent results.
Malt extract is available in a liquid or dry form. But be careful: which form you use affects how much you need for a given recipe. You can use a simple calculation to help determine what kind of original gravity – a measure of the fermentable sugars in your unfermented beer (wort) – you can expect from LME vs. DME. Here is the rule of thumb:
- 1 lb LME will produce a 1.044 original gravity when dissolved in 1 gallon of water
- 1 lb DME will produce a 1.037 original gravity when dissolved in 1 gallon of water
- You can use these calculations to determine how many pounds of LME or DME you need to achieve a known original gravity if you aren’t using a pre-measured recipe kit.
4. Yeast
Beer was brewed for millennia before brewers understood the role yeast played in fermentation. A previous article of mine in Brewers world details this. Today, you may have heard the common saying, “Brewers make wort; yeast makes beer.” In brewing, yeast, which is a single-celled fungus, consumes the malt sugars and produces alcohol and CO2.
Like malt extract, brewer’s yeast comes in liquid or dry form. It used to be that dry yeast was looked down upon as being of poor quality and not adding much to the beer, but these days there are many varieties of dry yeast made specifically for different beer types.
There are advantages and disadvantages to using either dry yeast or liquid yeast. Dry yeast has a long shelf life and requires minimal preparation to use. Liquid yeast comes in vastly more varieties than dry yeast but has a shorter shelf life and requires more careful handling. Either way, you can achieve the quality beer you are looking for.
5. Water
The quality of the water you brew with is important because beer is more than 90 percent water. Basically, water used for making beer needs to be clean and free of odors (a typical example of odor is chlorine). Other factors to consider with your water include its pH and “hardness” (minerality). Good brewing water should be moderately hard and have low to moderate alkalinity. There are ways to adjust your water chemistry, if necessary, to get it where you want it; however, many pro-brewers make perfectly good beer with “as-is” tap water.
Making Your Beer
Now let’s take a look at a classic adventure in personal brewing extract beer recipe kit:
Your first question could probably be - Is it an amber or a bock beer? It’s both! We’ve had so many requests over the years for this hybrid style that we did a bunch of research and came up with this recipe. Here are the details:
- Yield: 5 gallons
- Original gravity: 1.057
- Final gravity: 1.014
- Colour/SRM: Amber
- Alcohol by volume: 5.55%
- IBU (anticipated, alpha acids can fluctuate): 31
- Specialty grains: Dark Munich, Crystal 120L, Victory
- Hops: Cluster (boiling), Saaz (finishing)
Recipe kit includes: Liquid malt, specialty grains in a grain bag, and hops
This recipe is very popular here at Adventures in personal brewing. At 5.5% ABV, the alcohol content does not overpower the maltiness of the Victory and Munich malts, and the aroma of the Saaz hops comes through nicely. This recipe is perfect for beginners and well balanced for the experienced brewer as well.
Procedure: Always read all the instructions before you begin brewing, so you can be sure you have everything you need on hand (equipment, ingredients) and that you fully understand the procedure.
1. Clean and Sanitize:
Thoroughly clean and sanitize all of your brewing equipment.
2. Steep Your Grains:
Start by heating 2.5 gallons of water in your brew pot. Add the (crushed) specialty grains to the grain bag:
- 0.5 lbs Crystal (120° L+)
- 0.5 lbs Dark Munich
- 0.25 lbs Victory
Tie a knot at one end of the grain bag, leaving room for the grains to be loose in the bag. Place the grain bag in the water.
Slowly raise the temperature to 150° F to 160° F. Steep your grains at this temperature for 20 minutes. Remove the grain bag from the pot. Do not squeeze the bag; just let the liquid drain from the bag into the pot. You now officially have “wort” – unfermented beer. But there are several other steps to fully prepare your wort for fermentation.
3. Begin the Boil:
Bring the wort to a rolling boil, being careful to avoid a boil-over. Once you’ve achieved a boil, remove the brew pot from the heat source.
Now add:
- 7 lbs Pale LME
- 1 oz Saaz hops
- Stir the wort until the malt extract has completely dissolved. Any undissolved extract allowed to sit on the bottom of the pot will burn, so make sure you’ve stirred thoroughly before returning the wort to a rolling boil.
4. Add Aromatic Hops:
Let your wort boil for 55 minutes, then add:
a. 1 oz Saaz hops
These are your aromatic (or finishing) hops. Because you are boiling them for only five minutes, they add no bitterness but contribute their aroma and fragrance to the finished beer.
5. Cool the Wort:
Following the 60-minute boil, you’ll need to cool your wort down to below 100° F as quickly as possible. There are many ways to do this, but we at Adventures in personal brewing recommend using a wort chiller. (See our “How to Cool Wort Fast” page.)
If you haven’t already, now is a good time to sanitize your fermentation equipment, i.e., the “Ale Pail,” airlock, hose, and hydrometer. Your wort at this point is a big feast for microbes, and you don’t want any uninvited guests showing up to the dinner party. Anything that may come into contact with the wort should be sanitary.
6. Transfer the Wort to the Fermenter:
Siphon the cooled wort into your primary fermentation vessel (your “Ale Pail” if you’re using the basic personal brewing equipment kit), then top it off with enough cold water so that you have five gallons. You’ll also want to aerate the wort, either by using a diffusion stone or simply by rocking the fermenter back and forth once the lid is in place.
7. Determine Your Original Gravity:
Now is when you want to use your hydrometer to measure the wort’s original gravity (OG), which basically indicates a number of fermentable sugars present. You’ll want to record the number as you will use it later, along with your final gravity reading, to calculate your beer’s alcohol by volume (ABV). (See our “How to Read a Hydrometer” page.)
8. Pitch the Yeast:
Now it’s time to add, or “pitch,” your yeast into the wort. During fermentation, the yeast will consume the malt sugars and produce alcohol and CO2. The wort should be cooled to around 78° F before you pitch your yeast, but follow the procedures outlined on the yeast package. We suggest using one of the following yeasts for the American Amber Bock:
White Labs 001 California Ale Yeast. Famous for its clean flavours, balance, and ability to be used in almost any style ale. It accentuates the hop flavours and is extremely versatile.
Wyeast 1056 American Ale Yeast. Very clean, crisp flavour characteristics with low fruitiness and mild ester production.
A very versatile yeast for styles that require dominant malt and hop character. This strain makes a wonderful “house” strain. Mild citrus notes develop with cooler 60-66° F (15-19º C) fermentations.
Fermentis Safale US-05. A ready-to-pitch American ale yeast for well-balanced beers with low diacetyl and a very crisp end palate.
After you’ve pitched the yeast, seal the fermenter tight, attach the sanitized airlock and stopper, and fill the airlock with water.
9. Let the Wort Ferment:
Put the fermenter in an out-of-the-way, temperature-stable place. You should see activity within 24-48 hours as CO2 begins to escape the airlock. It will take from one to two weeks for the fermentation to complete, during which time you should do nothing to disturb the process.
Some brewers include a secondary fermentation step after about a week. It involves siphoning the beer into a secondary fermenter, such as a glass carboy, and allowing it to condition for another week or two. This step is optional (at least for some beers), but the advantages include allowing the beer to clear more, resulting in less sediment once you’ve kegged or bottled it.
10. Determine Your Final Gravity and Calculate ABV:
Use your hydrometer to take a reading of the beer’s final gravity (FG). You can calculate the beer’s approximate ABV using the following formula: ABV = (OG - FG) x 131.25
So, using our targets for the American Amber Bock, we’d get: (1.057-1.014 ) x 131.25 = 5.64% ABV
Note that this calculation provides only an approximation of the beer’s ABV, but it is the simplest method and is generally “good enough” for personal brewing.
11. Keg or Bottle Your Beer:
Siphon the finished beer into the bottling bucket. If the recipe calls for any bottling additives (such as priming sugar) to be added to the bottling bucket, add them now.
At this point, follow kegging or bottling procedures.
That’s all there is to making your own beer. After allowing the beer to condition, it’s time to share it with friends and family and brag about how you made it yourself. Welcome to pro/personal brewing!
Now you know the basic process for brewing your own beer. As you gain experience and confidence, you can work in more wrinkles, such as using gypsum to harden your brewing water (if necessary) or adding Irish moss to your boil to help with beer clarity.
There are many other aspects to personal brewing and we’re here to help you with all of them. Be sure to read our other “How-To” pages covering different brewing subjects. Or contact us with your questions.
Happy brewing!
I end my article with a quote from a good friend & business colleague Dr Newell Bascomb who lives in the US.
“I first got started with brewing because of a Father’s Day gift from my daughter several years ago. After following the kit instructions and not really understanding what or why I was doing we were all surprised when we tried our first bottle and exclaimed “it tastes like beer” Small step! From then I was hooked. There are so many ways to vary the components; different grains, hops, yeast and more recently I’ve used “additions” like oak chips to create an infinite variety of flavours. As a “retired” microbiologist/biochemist, in addition to making some really enjoyable beverage, I get to keep “playing in the lab”. One thing that makes my brewing a bit unusual is that I continue to brew only a gallon at a time. While many fellow brewers encourage increasing to 5-gallon batches (after all, it’s the same amount of work and time they argue), by doing a gallon at a time I get to try many more combinations, and if it doesn’t work out I loose 10 bottles of beer. I’ve actually never made anything we didn’t enjoy! What am I fermenting now? I just bottled a rum barrel porter and have a bourbon double IPA in the fermenter. Great for cold days in the mountains. When that goes to bottle, I’ll just have time to make my Saison with mulling spices in time for the holidays.”
- Dr Newell Bascomb